How to Plan a Road Trip With Google Maps
When you have children, summer breaks can seem long and never ending. Even for those without kids, it can be nice to break up monotonous summer months—or any other time of year, really—with a fun road trip. However, it’s not all snacks and singalongs; road trips require a lot of planning.
You may know that you want to pass through specific cities or see certain attractions along the way. Maybe you’re also planning to stop somewhere for the night to recharge or to prolong your stay at your final destination. You could start your road trip plans by making a mental list of these locations or maybe you’ll save yourself a headache by writing it down somewhere.
Wouldn’t a map make more sense? You can first brainstorm your desired locations in an Excel spreadsheet, then easily make a Google Maps road trip map you’ll be able to load on your phone.
You can create your road trip map with the three steps below:
- Determine the desired locations of your road trip
- Compile a spreadsheet (with categories and directions)
- Visualize the destinations of your road trip with Google Maps
As with any journey, to get started, first determine where it is you wish to go.
Determine the Desired Locations of Your Road Trip
The first step in planning a road trip with Google Maps is perhaps the most fun: deciding where you want to go! There are millions of cool places you can navigate to by car, though you may end up focusing on just one or two desired locations and the stops you’ll make along the way.
Spontaneous road trippers may feel extensive planning takes the excitement out of a road trip. After all, you could theoretically save time by just getting in the car and going, searching for attractions and restaurants near you on your phone. However, foodies and planners know that to get the best experience out of your trip, you can’t just stop at the nearest McDonald’s. Plus, if you have kids, food allergies, or specific ways of eating, prior research is always appreciated.
Interactive Maps Made Easy
Sign Up NowSo, you may know that you want to pass through specific cities or see certain attractions along the way. Maybe you’re also planning to stop somewhere for the night to recharge or to prolong your stay at your final destination. Or, if you’re struggling to come up with ideas, you can always look to popular destinations, such as:
- National Parks
- State Parks
- Historic Locations You Can Still Find on Route 66
- World’s Largest Roadside Attractions
Other than attractions, you may also want to plan stops at lodging, gas stations, family, or restaurants like the best restaurants in 25 major cities.
You could keep a mental list of all these locations, or maybe you saved yourself a headache by writing it down. But the best way to keep track of your road trip locations for mapping purposes is to first add them to a spreadsheet.
Compile a Spreadsheet (With Categories and Directions)
With a better idea about the locations you wish to visit throughout your road trip, transfer them from your mental list, Word document, or Notes app into an Excel spreadsheet or Google Sheets. This will aid you when it comes time to create a Google map.
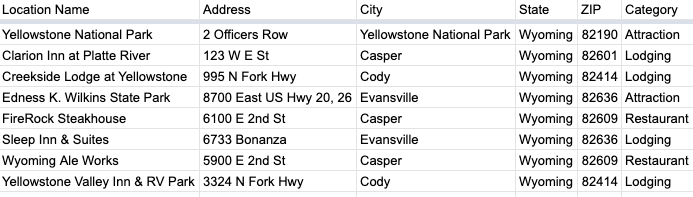
To compile your spreadsheet, you’ll want to put the information into several different columns with headings such as:
- Location name
- Address
- City
- State
- Postal code
- Category
For some Excel tricks on how to easily separate your data into columns, see Simplify Complicated Data in Excel Spreadsheets.
The address, city, state, and postal code are fairly self-explanatory; they’ll be needed for mapping the locations later. Location name is meant to identify the place you want to visit. You may choose to name it something like “Grandma’s house” or “highest-rated restaurant in Casper, Wyoming.” A category heading and subsequent column is useful if you want to later be able to sort your map.
Why Categorize Your Locations in a Spreadsheet
By assigning each of your desired road trip locations a “category” or “type,” you’ll be able to sort your map by the categories, filtering out the rest. This will certainly come in handy if, in the middle of your road trip, your hangry partner needs food immediately. Bypass attractions, gas stations, and lodgings when you sort the map by restaurants or fast food joints. Or, if you’re past “E”, you can narrow down gas stations without seeing the other points on your map.
To add categories, simply add a new column in your Excel spreadsheet. In the new Category column, assign each location a one or two word categorical description such as “Attraction,” “Lodging,” “Restaurant,” or “Gas.” You’ll elect if and how you want these categories to appear on your map when you start plotting your points.
Link Directions Between Places With This Excel Skill
Another useful column you may wish to add to your Excel spreadsheet are links to the Google Maps directions between your places. However, you don’t want to manually search Google Maps. Instead, make use of Excel’s CONCATENATE and knowledge of Google Maps’ links to come up with a formula like this:
=SUBSTITUTE(CONCATENATE("http://maps.google.com/?q=", B2, " ", C2, " ", D2, " ", E2, " to ",B3, " ", C3, " ", D3, " ", E3), " ", "%20")
As you likely know the order in which you’ll be visiting each location, the formula above creates a direction link from this row’s location to the next row’s location based on the columns you already created. So to work, the road trip locations need to be in a specific order. The last stop is empty because…you will have arrived! Now let’s see how to get this spreadsheet with categories and links into Google Maps.
Visualize the Destinations of Your Road Trip With Google Maps
Now that you’ve determined some of the locations of your road trip and compiled a spreadsheet complete with categories, it’s time to map your road trip with Google Maps, via BatchGeo. BatchGeo uses the Google Maps Geocoding API, known to have some of the highest quality data available. Other services require you to write code or manually geocode addresses one by one, but our service performs everything you need to do in several easy steps:
Interactive Maps Made Easy
Sign Up Now- Open your spreadsheet
- Select (Ctrl+A or Cmd+A) and copy (Ctrl+C or Cmd+C) all your data
- Open your web browser and navigate to batchgeo.com
- Click on the location data box with the example data in it, then paste (Ctrl+V or Cmd+V) your own data
- Check to make sure you have the proper location data columns available by clicking “Validate and Set Options”
- Select the proper location column from each drop-down
- Click “Make Map” and watch as the geocoder performs its process
You now have a map of your road trip with Google Maps, like the one below:
View Yellowstone road trip example in a full screen map
Our example road trip map depicts travel from Cheyanne, Wyoming to the destination of Yellowstone National Park (for the geysers, of course!). With two attractions and various restaurants, gas stations, restrooms, and hotels, the map has everything you need when traveling long (or short!) distances. You even have the option to automatically number each stop along the way in a particular order.
We may be biased, but we think BatchGeo is one of the best road trip apps. Plan your own road trip with Google Maps today via BatchGeo, which uses the Google Maps API so that you can create custom maps for free to better visualize your data.
