Dropbox Image Hosting for Google Maps Infowindows
Maps are a great way to visualize data, but they can never tell the full story. Whether it’s customers and prospects, houses for sale, or anything else that ends up in a spreadsheet, a map goes a long way to helping it make sense geographically. Once you’ve identified a single place on a map, it can be useful to go beyond the textual data from your spreadsheet. A well-placed image can give the location marker much more context.
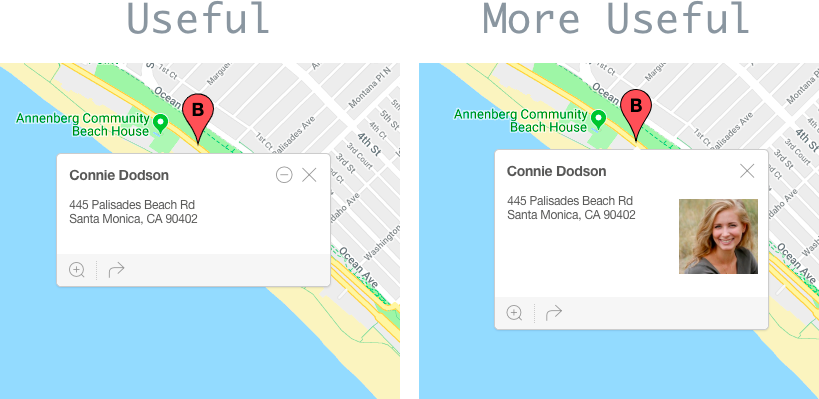
They say an image is worth 1,000 words. In the case of the Infowindow (what Google Maps calls that popup box on top of a marker), there isn’t room for 1,000 words. An image, however, can help tell the story without taking up much space. BatchGeo makes it easy to create Google Maps from your spreadsheets and include images in the Infowindow.
Create and Resize Images
Before you can add images to your maps, you need to find or create the images to use. You don’t need any fancy photo editing software to do it. You likely have everything you need on your computer. Both Windows and Mac come with a photo viewing tools that have minimal editing features.
You’ll need some source images. You may have photos taken with your camera or perhaps you can find publicly-available, license-free images on Google. Either download them to your computer or navigate to where they are stored and follow these steps:
- Double click one of the images to open in the viewer/editor application that comes with your computer. This should open up the file.
- Locate the image resize option and select it. In Preview on a Mac, for example, go to the Tools menu and choose Adjust Size.
- Set the width the 200 pixels and make sure to scale proportionally so the images doesn’t end up stretched out.
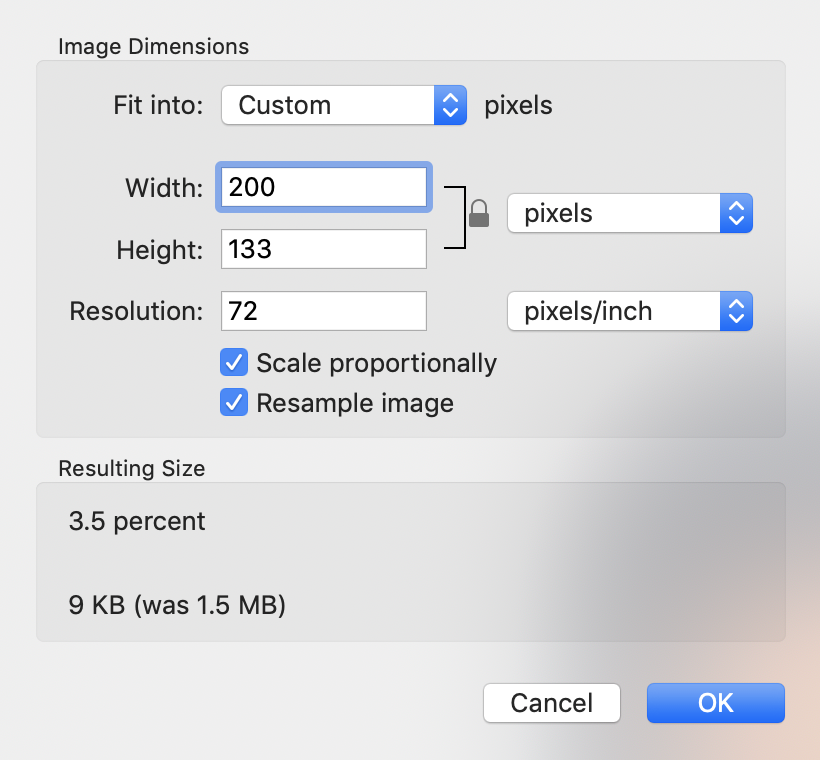
- Save the file as a new name so you can distinguish this smaller version from the original.
You can repeat the steps for as many images as you need. If you have dozens or more of images, you can look for bulk image editors or resizing tools to save you some time.
Interactive Maps Made Easy
Sign Up NowMake Images Public on Dropbox
Now that you have image thumbnails, we’ll want to store them somewhere. In order to embed them in our map, they need to be available somewhere on the web. For that, you need a web server and not everyone has access or the ability to self-host their images. Thankfully, there are public cloud storage services that make this easy. Dropbox is one of the most popular. If you don’t already have an account, you can quickly create one for free.
Follow these simple steps to essentially turn Dropbox into a web server for your images:
- Upload your images to Dropbox by moving a folder with your images into your Dropbox folder. You can also accomplish this through the web interface.
- Right-click the first file in your folder and select Copy Dropbox Link. On Mac, you’ll need to hold the Control key while you click.
- Paste the link into your spreadsheet or another location. Just make sure you have a way to remember which image goes with which link.
You’ll repeat that process until you have a link for each of the images. Each link will look something like this:
https://www.dropbox.com/s/rndmchrctrs12345/filename.png?dl=0
There’s one more quick change to make your image available publicly in the same way as a web browser. You’ll need to perform a find and replace in your spreadsheet. Search for www.dropbox.com and replace it with dl.dropboxusercontent.com. In our example above, the image will now have a link like this:
https://dl.dropboxusercontent.com/s/rndmchrctrs12345/filename.png?dl=0
Now you’re ready to create or edit your map.
Add Image URLs to Your Map Data
Turning a spreadsheet into a beautiful web map is what BatchGeo does best. You can declare some columns in your spreadsheet as locations and some as data that you want to display. Your image column is neither of these. It will take the text, which should be a web address (such as Dropbox links) and embed the image within the marker box, called an Infowindow.
Let’s say you have a list of your customer names, locations, and links to a photo of each of them. You could store it in your spreadsheet like this:
| Name | Address | City | State | Zip | Image |
|---|---|---|---|---|---|
| Caitlin Miller | 219 W Channel Rd | Santa Monica | CA | 90402 | https://dl.dropboxusercontent.com/s/mm1sdt66wh00b43/customer1.jpg?dl=0 |
| Connie Dodson | 445 Palisades Beach Rd | Santa Monica | CA | 90402 | https://dl.dropboxusercontent.com/s/4yk4fcjmo6gegwq/customer3.jpg?dl=0 |
| Ratliff Newton | 250 Santa Monica Pier | Santa Monica | CA | 90401 | https://dl.dropboxusercontent.com/s/ejkeo1t21ruqofn/customer2.jpg?dl=0 |
Notice the Image column includes Dropbox links using the dl.dropboxusercontent.com version. When I copy-paste the entire contents of my spreadsheet, including headers, into this simple map-making tool, it automatically produces a map like this:
View Dropbox Image Map in a full screen map
Click around and you can see the small thumbnails of my customer photos. If the tool doesn’t automatically pick up your Image column, edit your map. Choose Validate and Set Options, then Show Advanced Options.
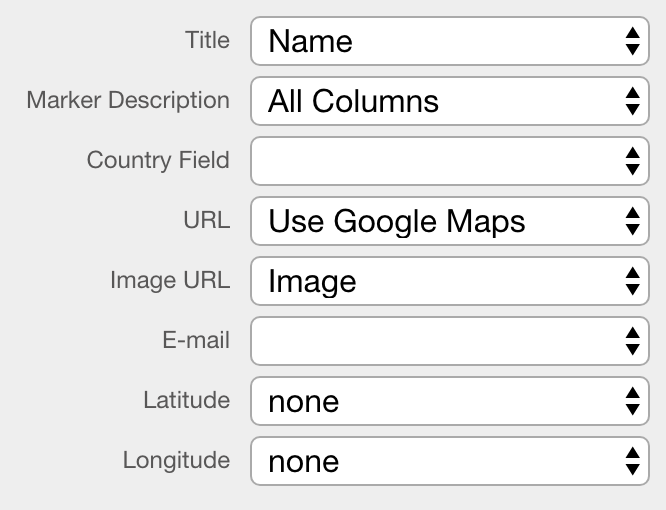
Make sure that the correct column is listed for Image URL.
Make Advanced Maps Without Writing Code
Customer images are just one example of an image embedded in a map—and a simple example of the power of BatchGeo. There’s a lot more you can do without becoming a programmer:
There’s a lot more you can do to explore the stories in your geographic spreadsheet data. Create a map today!
