9 Ways to Make Your Map Stand Out
You know BatchGeo as the fastest, easiest way to visualize your data on a map. Many of your favorite features, such as map data groups, are automatic.
Yet there are a few more tricks to get the most out of your data, specifically, the stuff that shows up within the Marker box that appears when someone clicks a place marker. This is where anyone using your map can get additional information about each location. You can set a title, re-order data, add images, and more.
There are even a few additional tricks that go beyond the Marker box to ensure your map grabs attention. Once you master these more advanced options, you’ll be well on your way to sharing your data with more and more users.
Maximize Your Map: Advanced Marker Box Customization
The Marker box, often underutilized, can elevate your map from informative to exceptional in the eyes of your users. So let’s take a look at five Marker box fields, from bold titles to supplemental links, all of which you can field under “Show Advanced Options” on your BatchGeo map.
1. Catch the Eye of Your Users by Bolding Important Data
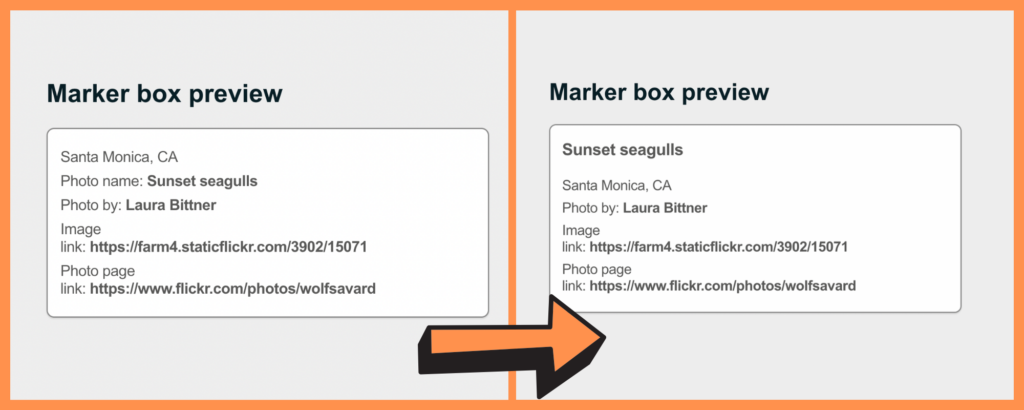
Your BatchGeo map displays a lot of information. Ensure the most important pieces stand out from the rest with this no-code way to designate one of your spreadsheet columns as the “Title.” Doing so will list the data in bold at the top of each Marker box.
BatchGeo may have already intuitively selected a “Title” field for you. Many times that will be what you want, though you can always change this to be another column of your spreadsheet you feel is more descriptive.
To adjust this, when creating or editing your map, hit “Set Options” to reveal your Marker box preview along with “Basic options.” Then opt to “Show Advanced Options.” The first in the list at the left is the “Title” option, which allows you to select any field, including location data.
2. Control What Users See with Marker Description Options
Underneath the “Title” field, there’s a dropdown for “Marker Description.” This is yet another opportunity to control what you want to display in your Marker box—and what you don’t.
Interactive Maps Made Easy
Sign Up NowBy default, “All Columns” may be selected. As a result, every column of your spreadsheet that you input into BatchGeo will be shown in the Marker box. However, if you’d rather display only one field (other than the “Title,” if one has selected or the location), you can do so within “Advanced options” as opposed to deleting information from your spreadsheet.
Choose “Set Options” to reveal your Marker box preview along with “Basic options.” Click “Show Advanced Options,” then use the dropdown underneath “Marker Description” to select what should appear in your Marker box.
3. You Choose the Order of Your Data
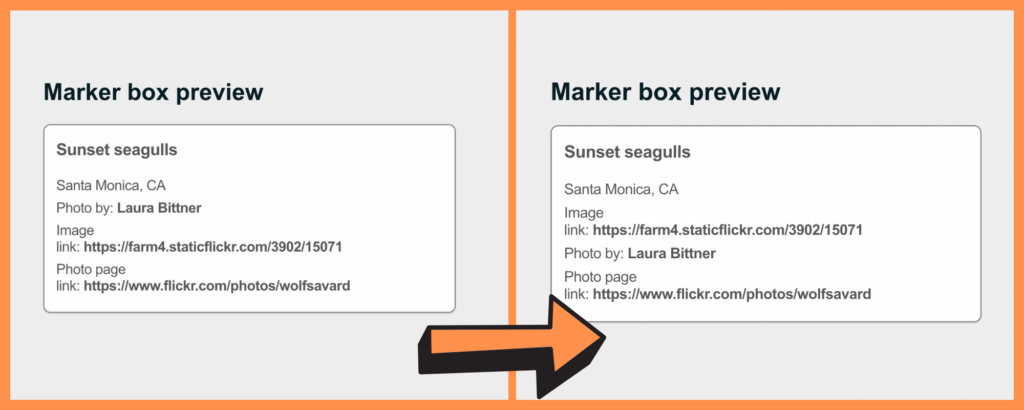
BatchGeo intuits the order of your data from your spreadsheet. Therefore, you have complete control over the order your data appears in the Marker box by changing the order within your spreadsheet.
The left-most columns will display first within the Marker box and the right-most columns will show last. Of course, you can catapult one field to the front by setting it as your title, and, seeing as this is a map, your location data will always appear right below your title. But the other field ordering will follow the spreadsheet.
To re-order your data, return to your spreadsheet. If you no longer have the spreadsheet, you can copy from BatchGeo. While editing your map, click into the map data and copy with Ctrl+C (Cmd+C on Mac). Then open an empty spreadsheet and paste with Ctrl+V (Cmd+V on Mac).
Choose the spot where you want to move your data and highlight and drag an entire column, or insert a new column and use Cut (Ctrl+X or Cmd+X on Mac) and paste. When your data is in the desired order, add it back into your existing BatchGeo map through the map data box.
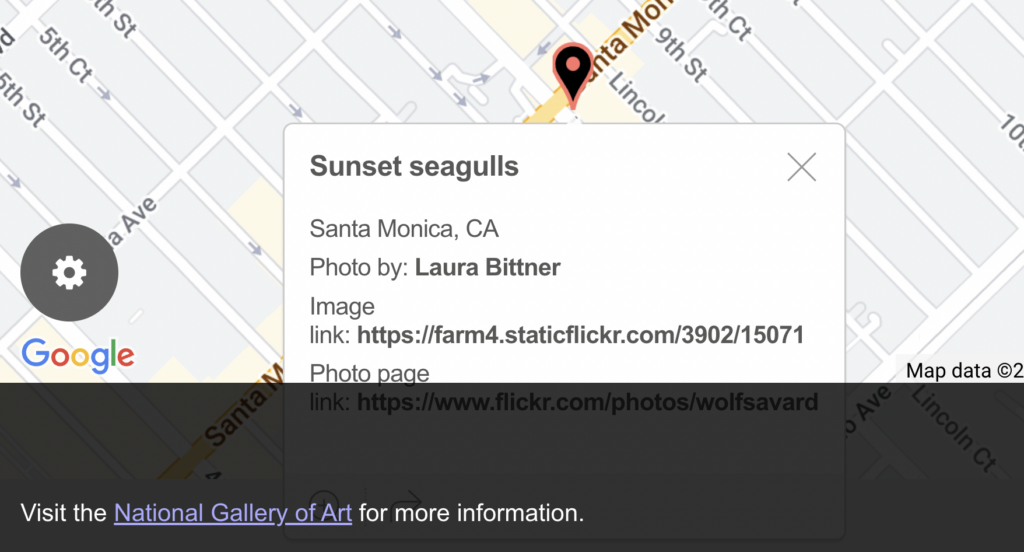
4. Add an Image for Every Location
More than just text, your Marker box can also display an image. To add images to your map, you’ll need to add a column to your spreadsheet with full URLs to web images. A full URL starts with the http:// or https:// and continues to include the domain name and path to an image file. For example, http://i.imgur.com/pY3JZsH.jpg is a full URL. You’ll need to use your own image host, such as Dropbox, or point to someone else’s image with permission.
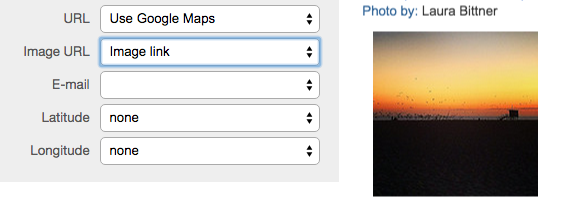
Once you have a column in your spreadsheet containing URLs to images, you can “Set Options,” then “Show Advanced Options” to reveal the “Image URL” drop-down. Select your spreadsheet’s image column and the Marker box preview will show you how the first item looks with your image.
5. Include Supplemental Data with Links
Similar to the image field, you can also create a hyperlink to supplemental data, such as a website with more information about a location. Again, this will need to be a full URL added to an additional column in your spreadsheet. This can be a web page that you control or another, such as an official website or visitor review page. Just make sure it’s the full URL, including http:// or https://, as described in the image step.

The URL field under “Advanced options” defaults to a Google Maps link, but you can make it any page on the Internet. Select the name of the column where you have the web URL in your spreadsheet and it will appear one of two places: if you have a title selected, it will now be clickable; otherwise, the link will display at the bottom of the Marker box.
4 More Tricks to Ensure Your Map Grabs Attention
The first five ways of making your map stand out were centered on the Marker box. But we didn’t want to leave out these four additional tips just because they were unrelated, although this first one is another way to see the same data.
6. Scroll to Reveal Your List
Every map with 500 or fewer locations comes complete with a list of every location for easy scrolling and searching. It works in full map view, as well as with your embedded maps, which we’ll go over a bit later in this post. With your mouse cursor over any portion of the map, scroll the page with the keyboard, scroll wheel, or other mechanism. You have now revealed the entire list of locations.
Interactive Maps Made Easy
Sign Up Now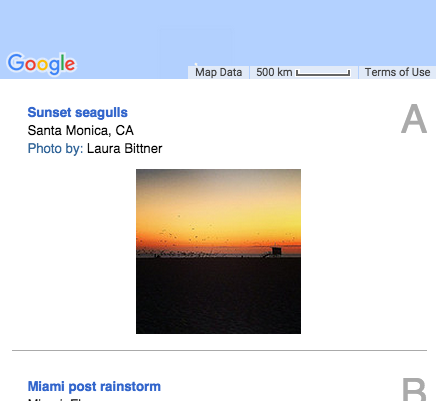
Everything available within the Marker box is also displayed in this list. You can use your browser’s built-in Find option (usually Ctrl+F or Cmd+F on Mac) to search for keywords within the data, or just browse the list, which is displayed in your spreadsheet order. If you’re using the grouping feature, the list will be constrained to whatever is visible on the map. Even better, any map labels are also included in the list and each item is clickable, opening up the Marker box to show the location on the map.
Moreover, this list can be enabled or disabled in the “Render Method” section when editing your map. Loading the “Map Only” is a little faster, but the “Map + Data” method gives you this searchable, scrollable list.
7. Customize Your Map’s URL
This tip might seem simple, but customizing the link to your map can certainly make an impact—even if it’s only to help you remember it! Perhaps more importantly, a custom URL makes it easier for other users to remember your map, too.
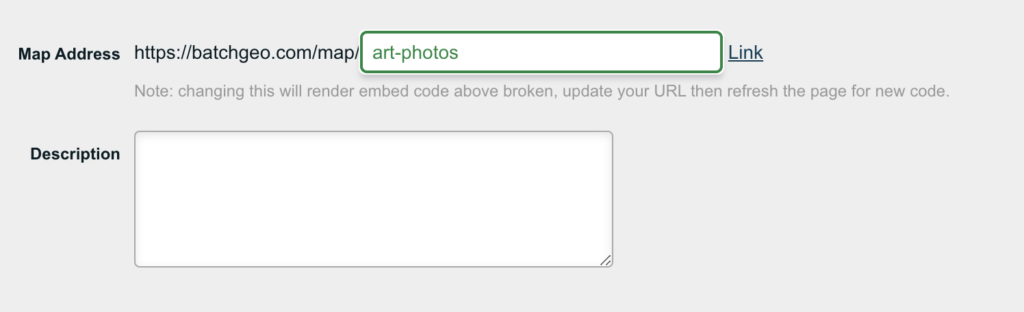
Stary by navigating to the Editing page by right-clicking your map and hitting “Edit Map.” Next, look for your “Map Address.” Click into the editable box and type a new URL, with “-” in the middle of any words, such as “art-photos.” Right below the “Map Address,” you’ll see the “Description.”
8. Provide Even More Information in the Description
Take your map another step further by providing users with more info in the “Description.” Not to be confused with “Marker Description,” this “Description” appears below your map and gives users more info, or, better yet, a call to action to visit your website.
To add a link to your website in your map, right-click your map and select “Edit Map”. Copy and paste the following HTML into the “Description,” filling in the missing info as you go:
<p class="has-line-data" data-line-start="0" data-line-end="1">Visit <a href="YOUR WEBSITE LINK HERE">YOUR WEBSITE NAME HERE</a> for more information.</p>
Now, all you have to do is “Save” your map. Speaking of websites…
9. Show Off Your Map with an Embed
You’ve ensured that your map will stand out, so why not show off your efforts by embedding it on your website.
While BatchGeo maps are hosted on our servers, they can also appear seamlessly on your website via the embed code we’ve automatically generated for you.
To find it, right-click your map and select “Edit Map.” Scroll down until you spot “Embed Code.” Copy and paste the it into the HTML of your website editor. For example, if you’re using WordPress, choose a “Custom HTML” block and paste it there.
The resulting embed will look something like this:
View Photos in a full screen map
Of course, there are more than 9 ways to make your map stand out with BatchGeo.
Pro users can do even more, including using advanced data selection tools for things like route optimization. Check out BatchGeo Pro today.
