5 Steps to Become a BatchGeo Power User
You know BatchGeo as the fastest, easiest way to get your data visualized on a map. Many of your favorite features, such as map data groups, are automatic. There are a few tricks to get the most out of your data, specifically the stuff that shows up within the Marker Box that appears when someone clicks a place marker. This is where anyone using your map can get additional information about each location. You can set a title, re-order data, add images, and more. Master these advanced options and you’ll be well on your way to being a BatchGeo power user.
1. Set a Title for Your Marker Box
By default, the first item in your Info Box will be the full location that was used to geocode the place. Many times that will be what you want, but other times there is a more descriptive name in another field of your spreadsheet. You can designate this field as the title, which will list it in bold at the top of your Marker Box.
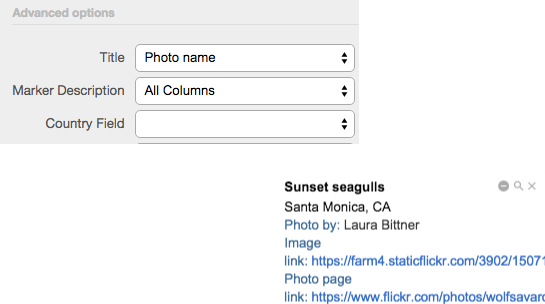
Choose Validate and Set Options to reveal your example Marker Box and the set of basic options. Then choose Show Advanced Options. The first in the list at the left is the Title option, which allows you to select any field, including location fields.
2. Re-order Your Data
BatchGeo intuits the order of your data from your spreadsheet. You have complete control over the order your data appears in the Marker Box by changing the order within your spreadsheet. The left-most columns will display first within the Marker Box and the right-most columns will show last. Of course, you can catapult one field to the front by setting it as your title, but the other field ordering will follow the spreadsheet.
To re-order your data, return to your spreadsheet. If you no longer have the spreadsheet, you can copy from BatchGeo. While editing your map, click into the map data and copy with Ctrl+C (Cmd+C on Mac). Then open an empty spreadsheet and paste with Ctrl+V (Cmd+V on Mac).
Choose the spot where you want to move your data and insert a new column. Then you can highlight and drag an entire column, or use Cut (Ctrl+X or Cmd+X on Mac) and paste. When your data is in the desired order, add it back into your existing BatchGeo map through the map data box.
Interactive Maps Made Easy
Sign Up Now3. Add an Image for Every Location
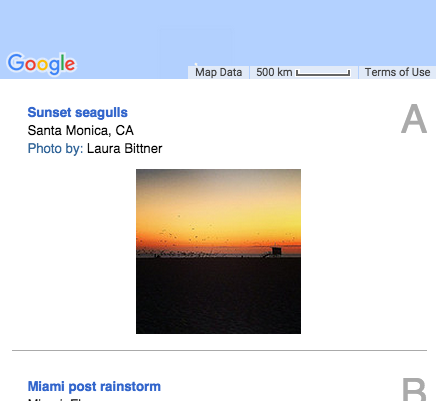
Your Marker Box can hold more than text, it can also display an image. To add an image to a location, you’ll need to make sure there is a field that contains a full URL to an image on the web. A full URL starts with the http:// or https:// and continues to include the domain name and path to an image file. For example, http://i.imgur.com/pY3JZsH.jpg is a full URL. You’ll need to use your own image host, or point to someone else’s image with permission.
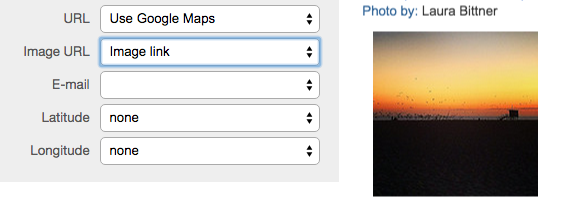
Once you have a column in your spreadsheet containing URLs to images, you can Show Advanced Options to reveal the Image URL drop-down. Select your field and the Marker Box preview will show you how the first item looks with your image.
4. Add Supplemental Data with Links
Similar to the image field, you can also create a hyperlink to supplemental data, such as a website with more information about a location. Again, this will need to be a full URL added to an additional column in your spreadsheet. This can be a web page that you control or another, such as an official website or visitor review page. Just make sure it’s the full URL, including http:// or https://, as described in the image step.

The URL field under Advanced Options defaults to a Google Maps link, but you can make it any page on the Internet. Select the name of the column where you have the web URL in your spreadsheet and it will appear one of two places: if you have a title selected, it will now be clickable; otherwise, the link will display at the bottom of the Marker Box.
5. Scroll to Reveal Your List
This last step toward becoming a BatchGeo power user isn’t exactly related to the Marker Box, but it’s another way to see the same data. Every map with 500 or fewer locations comes complete with a list of every location for easy scrolling and searching. It works in full map view, as well as with your embedded maps. With your mouse cursor over any portion of the map, scroll the page with the keyboard, scroll wheel, or other mechanism. You have now revealed the entire list of locations.
Everything available within the Marker Box is also displayed in this list. You can use your browser’s built-in Find option (usually Ctrl+F or Cmd+F on Mac) to search for keywords within the data, or just browse the list, which is displayed in your spreadsheet order. If you’re using the grouping feature, the list will be constrained to whatever is visible on the map. Even better, any map labels are also included in the list and each item is clickable, opening up the Marker Box to show the location on the map.
The list reveal can be enabled or disabled in the Render Method section when editing your map. Loading the Map Only is a little faster, but the Map + Data method gives you the searchable, scrollable list.
Of course, there’s plenty more than these five tips available to BatchGeo users. Browse the knowledge base or see how BatchGeo can help your business by uncovering the meaning behind your data.
