How to Print Address Labels from Excel
If you’re like us, you use Excel for a lot of things. Even if you have another contacts list, such as Google Contacts, you might find yourself exporting to Excel so you can easily view, sort, and filter. Excel also helps you prepare your list of names and addresses in a structured way so you can easily print them on address labels. Assuming you already have that Excel document with your list of friends, customers, leads, or other contacts, you are ready to go.
As with all things Microsoft, there is more than one way to accomplish what you need. For instance, there are many ways to start the Mail Merge process. We’ll describe just one of the easy ways to create labels with Mail Merge.
Note: In addition to labels, you can import your address list into Google Maps to create a map of sales leads, customers, friends, or other contacts.
How to Start
The first thing to know about creating a successful Mail Merge is what you are going to be creating, and to whom will you be sending it. Collect this data in your Excel spreadsheet, or create a list within Word. Let’s pretend we want to send out query letters to a few publishers for your great American novel. We’re going to make labels for envelopes with the following information:
- Company Name
- Contact Name
- Title
- Address Line 1
- Address Line 2
- City
- State
- Zip
The Mailing Tab
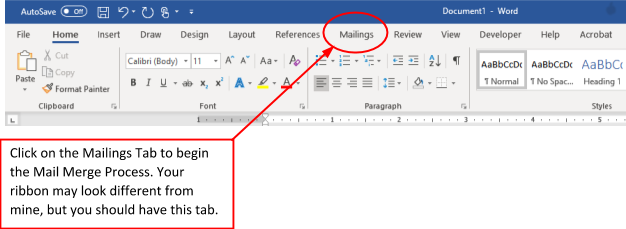
We’ll start from Word and the following instructions should work for Word 2010 on up. Open your Word program and click on the Mailings Tab.
Take this chance to save your document. If you can, turn on Autosave. It’s up in the upper left corner if you save your documents on OneDrive or a SharePoint server.
Gather Your Data
Double check that you have an Excel document ready with addresses, or add these examples we will be using:
Interactive Maps Made Easy
Sign Up Now| Company Name | Contact Name | Title | Address Line 1 | Address Line 2 | City | State | Zip |
|---|---|---|---|---|---|---|---|
| Simon & Schuster | Burt Reynolds | Publisher – 37 Ink, Atria Publishing Group | 1230 Avenue of the Americas | New York | NY | 10019 | |
| Random House – Penguin | Donna Cortez | Senior Editor | 1745 Broadway | Harmony | New York | NY | 10019 |
| Harper Collins | Becca Seacrest | Executive Editor | 195 Broadway | 22nd Floor | New York | NY | 10007 |
| Abrams | Zoë Kavinsky | Editor | 195 Broadway | 9th Floor | New York | NY | 10007 |
| Hatchette Book Group | Jamie Lynn | 1290 Avenue of the Americas | Little, Brown | New York | NY | 10104 |
Now we can begin using the Mail Merge wizard.
Begin the Wizard
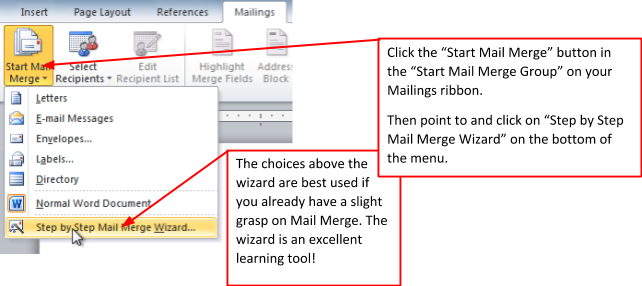
The wizard is the place to begin. When it starts, a new pane will open on the right of your Word screen. It looks like this:
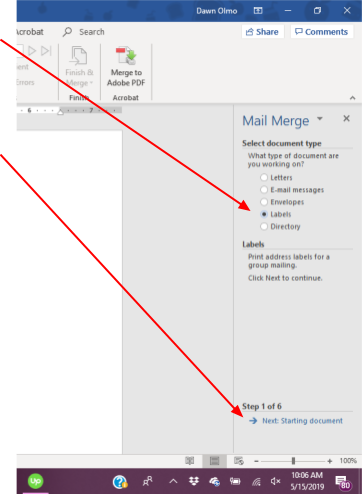
- Choose the type of document you want to create. In this instance, we’ve selected “Labels.”
- Click Next: Starting document
After you click Next, you have three choices.
If you already had something you wanted to use, select either of the second or third options. Since we’re starting from scratch, we chose, “Use the current document.”
Click Next: Select recipients
Enter Your Data
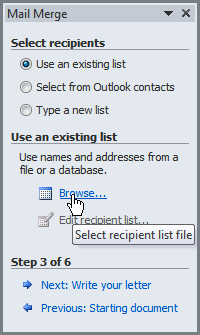
This is the important part of Mail Merge. You have several choices for data. If you’re using an existing list (usually one from an Excel file, but there are many other data types from which Word can extract data), you would choose “Browse” under Use an existing list. You can also use Outlook contacts if you have it. If you had already opened a list, you could also edit it from here.
You can also start from scratch when you click on “Type a new list” in the Select recipients group.
Click Next: Write your letter
When you click Next, a new window will pop up where you enter your data.
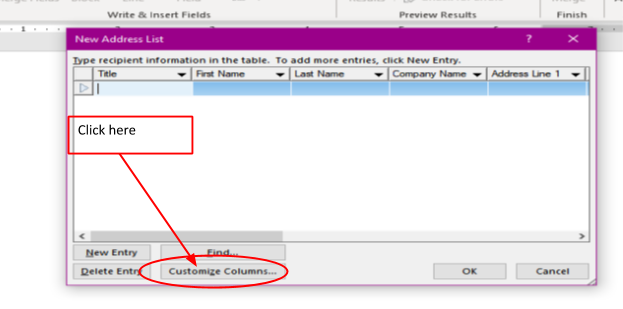
If you look at the field labels at the top, you may notice that it has labels for things the data did not include. You need to remove those fields before adding your own. To do this, click the “Customize Columns” button on the bottom left of the pop-up window.
Customize Columns
A new window will pop-up.

 Enter in your data, pressing the tab button between every entry to continue to the next field. Once you’ve entered your data, click OK.
You will be asked to save your list. Word automatically saves your data as an Access Database file, and it automatically puts it into the default folder for Word’s data. Name it as something you will remember. Mailing Labels for Submissions, perhaps.
Click Save. Click OK.
You’ll notice on the wizard pane, that “choose an existing list” is now highlighted.
Click Next: Write your letter
Once you have successfully input your data and explored the wizard, close the wizard by clicking the X at the top right corner. Now you’ll work on our labels using the ribbon.
Use the Ribbon to Finish Your Labels

If you have a certain type of label you are using–such as: Avery Easy Peel Address Labels (5160)–then click on the “Start Mail Merge” button and choose “Labels.” Do not choose labels from the Create group as it just allows you to quickly print labels.
You will use this pop-up window to choose your type of label. Check the packaging for the labels’ number, so Word knows what you are talking about.
Sometimes, it is hard to find your label type, but most of the time you can. For ours, we had to look under, “Avery US Letter,” as they are in order by size of paper. Then we had to scroll all the way down to find 5160 Easy Peel Labels. When you find your label, Click OK.
Word will tell you it has to delete everything from the document. Go ahead and click OK since we have a blank document anyway.
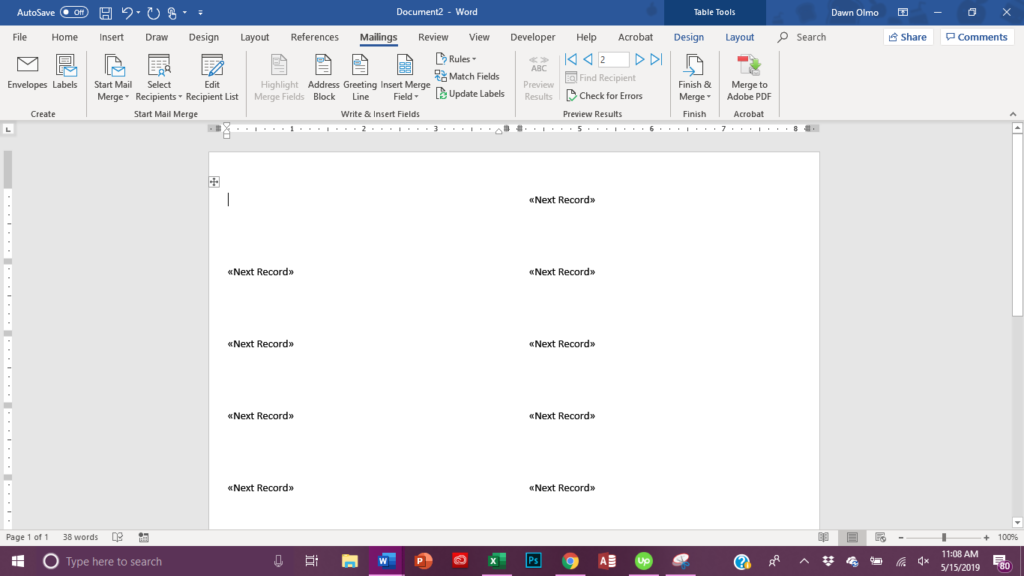
As you can see, Word automatically propagates all the labels with <<Next Record>>
However, your “Address Block” has not yet been added, so no records would appear if you tried to finish it now. So, in the Write and Insert Fields group on the ribbon, click “Address Block.” Since your cursor is already at the right cell in the table, it will put <<AddressBlock>> in that cell. Now you’re ready to merge!
Interactive Maps Made Easy
Sign Up NowMerge Your Labels
When you click Address Block, a pop-up window will open, asking you to choose the way you want your addresses to look. We went with the default settings and hit OK.
You will now see <<AddressBlock>> in the first cell.
Click Update Labels in the Write and Insert Fields group on the ribbon.
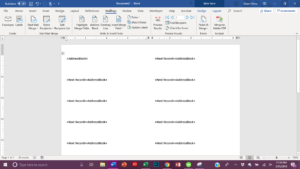 Now your document should look something like this. Notice how <<AddressBlock>> Was thrown into every empty cell.
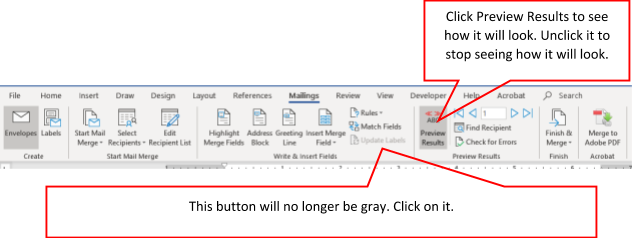
When you click “Preview Results,” it will propagate all fields. You may also notice that it looks terrible — Word added spaces between every line. Don’t worry, we’ll fix that quickly.
If you renamed a field, you may notice it is not showing up. To fix this, click the “Match Fields” button in the Write & Insert Fields group on the Mailings ribbon. We had to do this because we renamed “First Name” to “Contact Name.” By clicking on “Match Fields” we were able to choose what fields in our data match the fields that Word uses.
Edit and Make Pretty
To make your Mail Merge look more aesthetically pleasing, click on the little Plus sign on the table to choose the entire table OR click CTRL+A to select all. You can also click on the Select button in the Editing group on the Home tab and choose Select All. Word likes options.
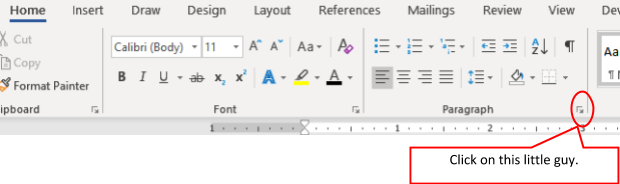
Now go the Home tab on your ribbon. With your document text still selected, click on the little arrow on the bottom right of the Paragraph group on the Home tab.
 A new window will pop-up.
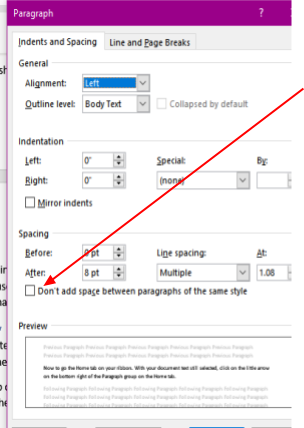
Check the box that says, “Don’t add space between paragraphs of the same style.”
Click OK.
Now, go back to the Mailings Tab.
Click, “Finish & Merge” in the Finish group on the Mailings tab.
Choose which records you want to use (we are using all records).
A new document will open containing your labels—ready to save and print!
Keep in mind you don’t have to use labels just for mailing. You can make gift tags, labels for products you sell or give away…the mind boggles with all the choices. Your imagination is the only thing stopping you from using Excel and Word to label your entire life.
Bring Your Excel Data Into the Real World
You’ve printed your addresses on labels, so that’s one way to add them to the real world. Every day thousands of BatchGeo users turn their spreadsheets into maps for research, community, and sales purposes. You can simply copy-paste to create a map, then share it with colleagues or friends.
View Santa Monica Mechanics (With Images) in a full screen map
Or, heck, maybe you’re just curious where all your friends live? Make a map of your holiday card list.
