Make a Map of Your Retailers or Sellers
The internet has made many things possible without leaving your device. You can order clothes, toys, household goods, and even groceries. Despite these e-commerce conveniences, most of life still takes place in the real world. People browse local shops to touch the merchandise and interact with their community.
There’s still a place for the online world within the offline world. People search the internet to determine where they’ll physically visit. Maps can help connect the virtual and real worlds, as you’ll see as we make a store locator map below.
View Example Map in a full screen map
A map like this is useful if you:
- Sell products through retailers
- Run multiple locations of a business
- Use consignment or other sellers for your products
All you’ll need is the name and address of the physical stores, then you’ll be able to build a Google Maps store locator without code in just in a few clicks.
Organize Contacts in a Spreadsheet
The first thing you need is a list of places you want to map. You may already have this stored in a text file, a CRM, or maybe even on a piece of yellow lined paper. A really good way to store your list of locations is in a spreadsheet.
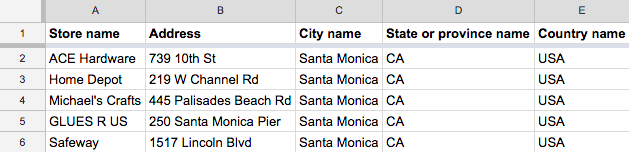
Create a new spreadsheet in Excel, Google Spreadsheets, or similar tool. Among the column headers you may want include:
- Store name
- Address
- City name
- State or province name
- Country name
If you’re already using another tool, you may be able to export them into a spreadsheet format, such as converting a CRM to Excel.
Or start fresh and add the columns you want to track, and add in all your locations. When complete, it will look something like this:
When you have a spreadsheet full of locations, you’ll be ready to create your map.
Make a “Find a Retailer” Map
An Excel or other spreadsheet document is a great way to share data with others. Additionally, you can use it to track and sort your locations or retailers. And when it comes to creating a map, it’s as easy as copy-paste.
Interactive Maps Made Easy
Sign Up NowFrom within your spreadsheet program, highlight all your data, including the headers. Use Ctrl+C (Cmd+C on Mac) to copy the data. Then go to the spreadsheet mapping tool on the BatchGeo homepage and put the data in the main box using Ctrl+V (Cmd+V on Mac) to paste.
The video above walks through a basic map, or you can find a full Excel mapping tutorial that walks through step by step.
When you’re done, your map will look something like this:
View Retail Locations in a full screen map
There are only a few locations on this map, but you could have many more. Each row of your spreadsheet will be one marker on your map. Additionally, you can include other data about the location, such as a category of store, inventory, or anything else you’d find useful.
Add Store Type and Other Details
Now that you have a basic map of locations, you can expand the map to include other data. The additional information will be displayed within the box displayed when clicking a marker. You can also use map marker grouping to filter only the markers that match the data.
What sort of data would you use? One common choice is a category or type of store. For example, many companies sell into different types of retailers. A glue gun manufacturer may sell to hardware stores, supermarkets, and craft shops. You could add a column in your spreadsheet for the type of store.
Other fields you could add for the each store include:
- A description of the store
- The hours the store is open
- Phone number(s) for the store
- Neighborhood or other category-like information
When you have your spreadsheet with the location and other columns of data ready, simply follow the copy-paste instructions above. This time, rather than clicking “Map Now,” you’ll want to “Validate & Set Options.”
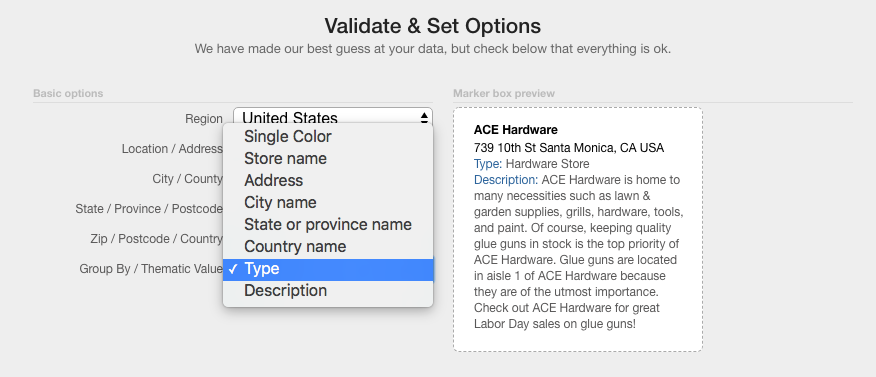
Double check the location columns are correct, then click the “Group By” dropdown to select Type, Category, or similar group-able field. Now you’re ready to click “Make Map” and see a map like this appear:
View Retail Locations with Type in a full screen map
Notice that the store types determine the colors of the markers. You can click the options at the bottom of the map to filter only the types you select. This location browsing can be very useful for you, especially if you have many retailers. It can also be a great service to your customers, so you can help them find their nearest place to buy from you.
Publish the Map on Your Website
Installing a “Find a Retailer” or “Store Locator” on your website adds professional polish. It also helps your best customers buy more from you! Once you have a BatchGeo map created for all your sellers, it’s really easy to add it to your website.
Every time you create a map, you receive an email with a link to edit your map. Also in that email—and on the edit page—you’ll find “Embed Code.” This is some HTML you can use in any website to easily include your map within your existing website.
All you need to do is create a new page or choose an existing retailers page. Then copy-paste the Embed Code to your website.
Add a Search Box
Each BatchGeo map comes with its own search box in the upper right hand corner. You can use it to enter a city, postal code, or full address to search the map for the closest location.
In addition, you can include a search box without a map anywhere on your website. From the same map editing page, choose “Locator Code” and copy-paste that into a single page on your website, or a header/footer template to include it on every page. Let your customers find a retailer or store location from anywhere on your site!
A Map For All Your Data
Now that you’ve created a map of store locations, what other spreadsheets or lists of addresses could you make geographic. Get customers or leads on a map, perform geographic data analysis, or simply map your address book to see where all your friends live.
Interactive Maps Made Easy
Sign Up NowAll you need is a simple spreadsheet with addresses, and we’ll turn that into a useful map. Make your first map today!
